


You may need to do a lathe spindle removal and replace the bearings if you’re not holding a tight tolerance on your LeBlond lathe. This process is recommended every 10 years or so on your machine.
You also may need to replace the spindle bearings if you damage your machine. For example, you may shear the key or crash the machine and rip the gears on the spindle.
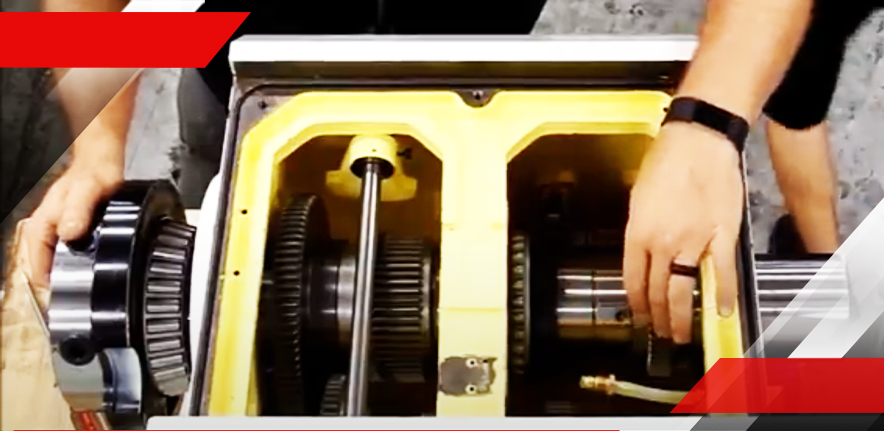
Check out the video below for detailed directions on how to remove a LeBlond lathe spindle. The video shows the process and informs you of the tools and personnel that are needed
You can find the tools mentioned in the video at McMaster-Carr and Grainger.
If you have any questions or need spindle bearing parts for a LeBlond lathe, please call (888) 532-5663 and dial Option 1. We look forward to hearing from you!
*******************************************************************************
Video Transcript of How to Do a LeBlond Lathe Spindle Removal
(00:06):
Hello, I’m Chris Smith with LeBlond Ltd. Today, we’re going to do a video on how to take out a spindle on an RKL-1960 variable speed lathe. A couple things to help get it started … first, we want to start off with safety. We want to do a lockout tag out and make sure power is killed. You lost it. Want to kill your emergency safety, switch things to help you out of the way you started off with we’ve set up a workbench. So when we take something out, we can just lay it out. That way we can just lay it out and put it back in the place of how it came off and put it back together. You’ll also need is your machine manual. And, on page 38, is your headstock breakdown. I’ve gone ahead and printed out a page and enlarged it to help so you can see it better.
(00:52):
So to get started, we can do a couple of things real quick. We’ve got to take off the chuck guard. There’s a safety switch behind the chuck guard that will also just have to be removed. And just set aside this back cover easily just comes off and set aside. And this control panel, the whole panel with a screw on the side will be lifted off as well. And then we’ll take off our headstock. Okay, we’ve gone ahead and removed all that stuff. The covers fold this back. Now we’ve got the spindle exposed. We’ll come back here and look at the spindle. And on the very back end, you will notice that there’s a punch mark. And then up here on this black ring, this ring is actually a balancing weight. You’ll see another markup on top of that. Those are very key points to look at and look for.
(01:56):
So when you put this back together, you line up that punch mark with this punch mark. So it puts the spindle back into balance. So we’ll go ahead and remove that with a number four Allen screw. There’s only one screw in there. We’ll also go ahead and remove the encoder reader for your digital readout that tells you your speed. We’ll go ahead and remove that and lay it off to the side. And we can also go ahead and unbolt our cover here with another number five Allen wrench, and remove that cover. And then we can come around to the front side and on this front ring, it is your front bearing cover. We’ll go ahead and unbolt that as well. Now, if you come up top of here and look down inside the head, you’ll also see your oil manifold lines. What this does is what disperses oil into your bearings.
(02:52):
And along the gears to keep your machine lubricated, as it’s running now … a few of your lines, you may have to disconnect in order to get this whole manifold out. So with a number eight wrench, you can just go ahead. I’ve already loosened these up a bit, just to speed up the video time, having that out and with a small pair of pliers, you may even have to bend some of these, the tips of them to get them to come out. So I’ll go ahead and remove these other two lines and then remove this whole manifold itself now to take the manifold out and disconnecting it. It’s much easier to disconnect it right here at this fitting. Instead of taking it all this whole hose and stuff out, it’s easier to disconnect it here at this fitting for lifting that out. Okay? So you can see here, we’ve already gone ahead. We’ve got this back cover off and you can take precaution does be easy because there is a gasket on the back of here. If you keep it all intact, then you can still reuse it. See, having a table, laying out everything as it comes off, the spindle is the easiest way to do that. Now we’ll look up inside here and you can see we’ve gone ahead and removed the oil manifold and all the lines exposing the spindle. So what will have to happen next? And it can be a little bit tricky is over here on this side is a large snap ring. So you have to use a large pair of snap ring pliers.
(04:38):
With a 90-degree angle to get in here, to get this off. And it can be tricky. It can take some time to get off and it helps to have an extra set of hands if you do. And then after you get that spread out and slid back, you have your spindle nut here, and that has three set screws. You can see as I spin around the three set screws, holding that on. You want to loosen those all up first and the best way to get that off. If we recommend the spanner wrench, you can hook the wrench on and knock her loose and same way with tightening it. Now, if you aren’t lucky enough to have a spanner wrench and you can’t get ahold of one, yes, another trick you can do using a cold steel chisel
(05:37):
And flatten it down to a flat end. As you can see there and a hammer and sticking it inside one of the grooves for the span of wrench and busting it loose that way. But the spanner wrench is the best way to go. So you can also at the end hook a torque wrench to it as well, because this needs to be torque at 75 foot pounds. Okay? So now we have our spindle nut, all backed off and slit back. We’ve gotten our snap ring out of the groove and pushed to the back to give us some room. And as a safety precaution, I’ve gone ahead and laid some wood down over the bed to protect the bed ways. So when we bring the spindle out, nothing drops and damages our bed ways. So we’ll go to the back here and they get started working on the spindle. I know it seems a little crazy, but we’re going to take a sledgehammer slowly working its way out. Now we’ve gotten it towards drop down. So now it’s going to get a little bit more critical where I’m going to have to bring in a separate helper – another set of hands to help work – to spend a loud and pull off gears as the spindle comes out. Okay. So as you can see, we’ve got the spindle loose. We’re starting to come out, I’ve got an extra set of hands. That’s going to help me. We’re going to work on sliding it out and taking years off and bearings out as we go. So here we go.
(09:28):
You can just set that down inside for now. So that you can see now that everything’s out, we can take the spindle shift over …
(10:03):
Lay it on the work bench and we’ll work on this bearing, getting it off. Okay. As you can see, we’ve got to spend a while we’ve laid out everything that we’ve taken off inline of how it came off the spindle, except for one gear that was too large to come out. It’s still sitting in here, which is fine. You can leave it just sitting down in here, unless you take this bar out. Now, if you take this bar out, there’s a lot of springs in here. And if you do that, then you’ve got to take off your whole electrical cabinet to put that all back together. But so just leaving it down inside, there is not a problem. So what you would want to do, you can see these lip formed here. On each side, and these are your outer rings from your spindle bearings. And you can use a brass punch or even a steel punch. Since you’re taking these out, we just put it on there, give it some taps all the way around in a four-point position. Put it on your car tire and go to the top until you get those rings out. And then you would go ahead and tap your new ones in. Now, back over here with the spindle, you got your bearings still attached up here, being held on here. You’d want to take this key way out. Now, these key ways can be fitted to inside this hole. So a good rule of thumb I’ve already gone and taken a Sharpie and mark, where I would take that out. You can take a M6 screw….
(12:04):
Put that in there and use a slide hammer, or just tap out a pair of pliers, get a good grip and pull that out. Then what we typically do, cause we would lay a board down on the ground, take the spindle, stand it up and there’s punch it down. And until that bearing gets past that lip and then would slide right off. Once you have it off, you’d go ahead and put your new one back on. Okay. You would replace your gasket here. That would be supplied with the changeover kit and then do all the steps in reverse. And we’ll go through that. Okay. So now that we’ve shown you how to take the spindle out and knock out the rings, we’re going to go back through and put the spindle back through, through the sequences and me and Ryan will be doing that together again, you’ll definitely need a second pair of hands for this as the spindle is heavy. So here we go.
(15:00):
Okay. Okay. So now we’ve got the spindle pretty much, mostly the way in we’re working on getting this key, locked back down in, in lined up with this gear. And then once we get that in and the key line up with the gear and we get it in, we can start locking down our spindle nut, and also that really large snap ring to lock everything down, down in place. No. Now when putting this spindle nut on, you want to be very careful that you don’t cross thread it. So take your time and just work it and make sure that it’s not cross-threading. It goes on nice and smooth. We can even shoot it with a little bit of oil to help. Okay.
(18:01):
Okay. So now we’ve got our spindle nut locked down and feeling pretty good and tight. We want to come back over to this side now, cause we still have this loose because our giant snap ring is still not locked in place. So just with a large screwdriver, you can walk it back across here, spend your spindle around for it. Bring her in and lock it into place. Now, if at all possible using your spanner wrench, this nut needs to be at 75 foot pounds is what is recommended. If you can’t get it there or you don’t have a way of testing, it that’s, that is I guess. Okay. But just try to get it as tight as you can and something that you can do to help seat it. Take your sledge hammer. Once you got it back into place. Tap just one time. This way, come to the back end. And tap at one time.
(19:23):
That will help the shaft move. If it’s got a little bit and then you can put your spanner wrench back on it and pull it tight again. Now you may notice that this gear here has a little bit of wiggle in it. Once you get the back cover, bearing cover on this side, put up against it and screwed in. That’ll push that all in and make that tight again in one unit. So that’s all we have left is come back around, up here, put our screws into our front bearing cover. We stuck one in just to keep it from spinning around on us as we were getting the shaft, when we got really close. So next we’ll go ahead and put the back cover and get that put into place. Okay. Gosh. And not to get your hydraulic hose hung up in it: just get them good and snug. At first, that way they’re all kind of pulling the same way as not to damage the gasket. Then once you got it snug, then go back around. Now, as I said before, where you’ve got that punch mark. And putting the weight back on. You want to look for the punch mark on the top too. And you see this down here on the bottom, put it right up here, up at top.
(22:37):
And you’ll see where your mark was, where it was, where it was situated at up here where the set screw was holding it down. That’s a good rule of thumb. And not to forget your encoder reader. Okay. Keeping it loose. Before you tighten it down, you want to find the little rail that’s going to go over top of the encoder itself and line it up to that. It’s not hitting, but you got about a one-eighth inch to one-16th inch gap.
(25:00):
We can always go back and readjust them when we fire it up and make sure that it’s reading correctly. Go ahead and lock that down and then just go ahead and put your oil manifold all back in, keeping careful to put all your hoses back in and you’re done. Okay. Now that we have the spindle, I’ll put back in with new bearings, we’ve got your oil manifold back in to do all the oiling and everything. Put your guard back on. So what you’d want to do next is power up and run it through your midrange speed for about a half hour, and then go to your high range speed and run it for another half hour. So you want the machine to run for a full hour, just, just running with no load on it. And then once that hour is up, you’ll want to come back, take the cover back off the head, cover back off and just check your spin on that. As it could move something might’ve not gotten fully tight. So we just want to double check and make sure it’s good and tight. That’s always a good rule of thumb – just to make sure everything stays precise.